Showing posts with label hx. Show all posts

Tuesday, March 1, 2022

Dress 2/15: Strawberry Dress But Make It Blue Polka Dots. Part 1

 HAVE YOU EVER WONDERED HOW IT FEELS TO SPEND 40 HOURS MAKING A DRESS WITH MORE LAYERS THAN AN ONION? TAKE THIS JOURNEY WITH ME AND FIND OUT!!!!


Our main fabrics are here!


Once again we're gonna start with bodice construction, a 5 part process in the case of this cottage core monstrosity.

First layer: lining. The only layer that doesn't feel like Satan has sent billions of spiders to crawl on your skin.

Needed some darts so as to not hang off the torso like a sad potato sack.


Layers 2-3: fluff and color. These add volume and opacity, as well as setting the undertone for the top layer.
Gathered at the bottom to align with the lining.


Layer 4: polka dots. Does exactly what you would expect, adds polka dots.
This layer ALSO gets gathered because 20 of the 40 hours that went into this dress were spent on gathering.


Repeat the creation of all 4 layers with a higher neckline for the back of the dress. These layers are not gathered. Thank god.


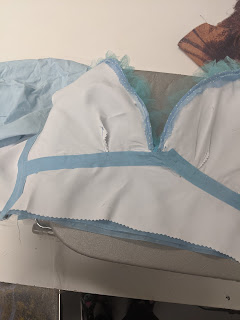
To the inner neckline of the dress goes... More gathered fluff! Held in place with the tiniest ribbon possible.
You may be thinking "HX, that looks like it feels like fire ants." and let me tell you it sure does!!


Another four layers of fabric create the midriff.
Pros: Not gathered. Cons: Also connected with extremely thin ribbon.


Finally, because I do not hate myself with every fiber of my being, I line the inner seams with iron-on seam binding to keep them smooth and by extension keep myself sane enough not to rend my skin from my body the second I put the dress on. Sidenote: I did not do this to enough seams. I really need to do this to more seams.


Tuesday, February 22, 2022

Dress 1/15 part 3

LETS MAKE A BELT AND SLEEVES.


I cut out and hemmed the midriff.


Then attached it to the dress, leaving a little bit of extra on one side.


That extra fabric gets gathered into a bow, wrapped in ribbon, and turned into a snap.


Added a little loop and button clasp at the top of the back.


I measured, hemmed, and gathered the sleeves before sewing them around the arm-holes of the dress, and with that we have our final element and I can stop dealing with this 3 part nightmare post and try to make shorter posts that aren't written like rushed tutorials.


THE END.

Monday, February 14, 2022

Dress 1/15 part 2

When we last remembered to post, we had an entire skirt! wow! but a skirt a dress does not make. Let's make some other parts.


Gonna go ahead and cut out one side of the bodice and drape it on the dressform to see where I need to adjust the length, then I can make said adjustments and trace the piece to get the other side of the top.


Now I can cut out the sides of the bodice and sew all four pieces, right sides together, into the shape they're supposed to be in. I also take this opportunity to hem the neckline so it doesn't fray.


The insides of those seams were insanely messy, so like any reasonable person I beat them into submission using an iron so they would lay flat for the next step.


The next step of adding more accent seams on each side of the seams I just ironed into place. Why did I do this on a dress I had 3 days to finish? Hubris. Then I attached the bodice to the skirt and locked another part of this 19 hour nightmare into the "Done" category.

Tuesday, February 8, 2022

Dress 1/15: Low Budget Scifi Has Nothing On Me. Post 1.

LET'S BUILD A DRESS IN 19 HOURS! 
WHY WOULDN'T ANYONE WANT TO DO THAT TO THEMSELF?


We're starting here! 
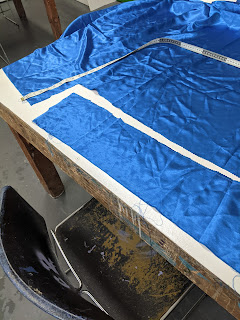
With some chunks of fabric. 
Lets cut out two donut shapes!


There we go! That's a skirt right? Almost. Not Yet.


After messing around with pleat sizes for about half an hour and then pinning all of them, it's more skirt than it is "two flat donut shapes attached to each other."


After sewing the pleats in place and hemming the entire thing THREE TIMES for that funky accent thread detail, I can connect the back of the skirt up to where the zipper will be.


I ironed the inside seam in place so it wouldn't stay all skrunkly, and for now the skirt is done!

Pa/Rasites: Portfolio book